After you’ve installed the soSIMPLE Calendar web pages on your server, go to the configuration url to set up the calendar (https://<your server>/sosimple_web/config/index.php).
Click on the “Data Source” tab to connect it your FileMaker file.
Name

Data Source Name: You can name the data source what you’d like. This is for reference only at this time. It may be used for custom features in the future.
Type: To interact with FileMaker events on your web calendar, choose “FileMaker” as the Type.
You can also show events from an iCal feed but we don’t recommend doing that for your first data source, since the first data source will be used for new events.
File Access
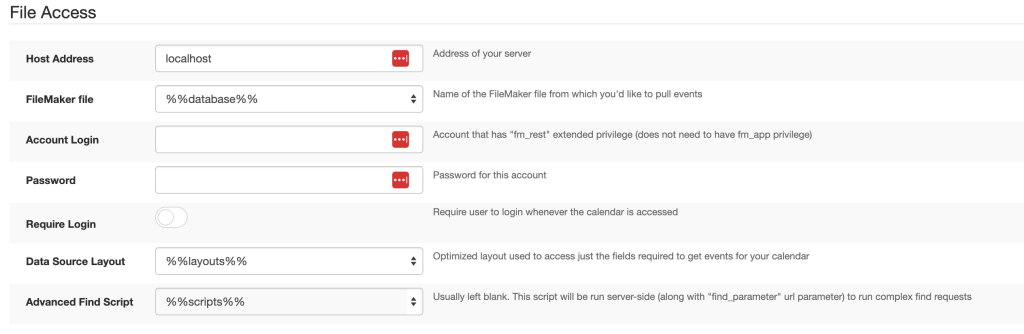
Host Address: type in the fully qualified domain name (fqdn) of your FileMaker Server
this should be the same address as your SSL certificate is issued to
FileMaker File: Once you’ve selected a host, you should see a list of available files. If you don’t, you may need to temporarily adjust your server to disable Filter Databases based on account (you can turn it back on after you’ve chosen a database). Chose your FileMaker file that includes your events table that you’d like to show on the calendar.
Account Login / Password: Enter the Account name and password that you enabled for the Data API.
Require Login: Turn on this option if you want to be prompted for a login every time you open the calendar. This adds security to the calendar itself, and also allows you to filter events based on that user’s access privileges.
Data Source Layout: Once you’ve successfully entered the Account Login and Password, you will be able to choose a Data Source Layout. This layout should be based on the table occurrence of your events. For optimization, it should only include the fields that are required to show the events on the calendar. (generally the ones listed in the Fields section below)
Advanced Find Script: This is almost always blank. Occasionally it is used for special requirements. We discuss that more in our Advanced Find article.
Fields
Once you’ve select a layout to base the calendar on, this section will show a list of fields available on that layout for each field.
A description of each field and how it’s used is shown to the right of the field. There are a few that could use some special attention:
- Required fields. These fields are required to show an event on the calendar:
- Date Start
- Date End
- Time Start
- Time End
- Event ID
- Event Text
- Resources:
- The Resource field gets special treatment and is used to determine the what resource show on the calendar.
- On this layout in FileMaker Pro, you must to attach a Value List to the Resource field in order to show resources on the calendar. This can be a checkbox set, a radio button set, a popup menu, or a dropdown list. It doesn’t matter which you choose.
- The Value List can be of any type
- A value list of type “custom list” will use each value as a resource
- A value list of type “from Field” where you only use the left hand field will use that field as a resource.
- Finally, a value list of type “from Field” where you use a second field (two columns in the value list definition) will be treated specially. In that case, the first field (on the left) will be the key field and the value that’s stored in your event record. The second field (on the right) will be what is display as the resource name when viewing the calendar. This works the same as within FileMaker.